Monday, November 27, 2017

Call by Value, Call by Reference and Call by Pointer

#include <iostream>
using namespace std;

void call_by_reference_swap(int& x, int& y) {
int temp;
temp = x;
x = y;
y = temp;
}

void call_by_pointer_swap(int* x, int* y) {
int temp;
temp = *x;
*x = *y;
*y = temp;
}

void call_by_value_swap(int x, int y) {
int temp;
temp = x;
x = y;
y = temp;
}

int main() {
int a = 10, b = 20;
cout << "a = " << a << "\t b = " << b << endl;

call_by_value_swap (a, b);
cout << "a = " << a << "\t b = " << b << endl;  // Expected output a = 10, b = 20

call_by_reference_swap(a, b);
cout << "a = " << a << "\t b = " << b << endl;  // Expected output a = 20, b = 10

call_by_pointer_swap(&a, &b);
cout << "a = " << a << "\t b = " << b << endl;  // Expected output a = 10, b = 20

return 0;
}

------------------
Output:
------------------
a = 10   b = 20
a = 10   b = 20
a = 20   b = 10
a = 10   b = 20
Press any key to continue . . .

References always pointing to "something" as compared to "pointers"  which can point to anything. 

Example
void call_by_pointer_swap(int* x, int* y) {
int temp;
temp = *x;
x++;
*x = *y; 
*y = temp;

}

Now this code can behave haywire or even crash. You can't say. That's why from safe programming aspect, its good practice "when in doubt, go for call by reference" :)

Thursday, August 10, 2017

JVM - JIT details and its optimisation techniques

Where Just-in-time compilation comes into picture ?
->Here is simple diagram that I have prepared as per my understanding:


JVM implementation is doen using C. JVM development rules are left to developers (developers of Oracle JVM)
Just-in-time (JIT) compiler, optimizes & compiles a piece of bytecode into machine code, and that part is subsequently executed.
The pieces of code to be compiled using JIT are decided based on the statistic(profiling information) of run-time received from interpreter. These are called HotSpots at run-time.

JIT process is started as thread in background. It generates code tailored for the target architecture

There are two types of compilers in JIT:
C1 i.e. client compiler: Low processing time but less optimized solution -> Applied for small pieces of code
C2 i.e.server compiler: Higher processing time but more optimized solution - > Applied for big pieces of code 

The VM uses the interpreter to execute the code (without optimizations) immediately after starting and profiles it, to decide what optimizations to apply. It keeps track of the number of invocations for each method, and if it exceeds the threshold of the c1 compiler, it makes the method eligible for optimizations by the c1 compiler, so it’s queues the method for compilation. Similarly for the c2, if the number of invocations reaches a certain threshold, eventually it will be compiled by it.

Optimisations like following are done:
1. Inlining methods
2. Synchronisation lock coarsening
3. Dead Code elimination


Replacing variables on stack i.e. On stack Replacement (OSR), which is difficult task, done by JIT in final optimisation steps.

Conclusion:
My conclusion is not to waste time on local optimizations. In most cases, we can’t beat the JIT. A sensible (yet counter-intuitive) optimization is to split long methods into several methods that can be optimized individually by the JIT.

You’d rather focus on global optimizations. In most cases, they have much more impact.

Python code interpretation and execution stages


Python code gets compiled in following fashion.
If byte code is generated using Cpython then it is executed using Python Virtual machin (PVM)
If byte code is generated using Jpython then it is executed using Java Virtual machin (JVM)

Tuesday, August 8, 2017

ARM architecture concept of Bit-Banding to solve problem of Race-condition in case of register value update

Two 1MB 'bit-band' regions, one in the peripheral memory area and one in the SRAM memory areas are each mapped to a 32MB virtual 'alias' region. Each bit in the bit-band region is mapped to a 32bit word in the alias region.
The first bit in the 'bit-band' peripheral memory is mapped to the first word in the alias region, the second bit to the second word etc.
Code example of using Bit-banding:

// Define base address of bit-band
#define BITBAND_SRAM_BASE 0x20000000
// Define base address of alias band
#define ALIAS_SRAM_BASE 0x22000000
// Convert SRAM address to alias region
#define BITBAND_SRAM(a,b) ((ALIAS_SRAM_BASE + (a-BITBAND_SRAM_BASE)*32 \    + (b*4)))
 
// Define base address of peripheral bit-band
#define BITBAND_PERI_BASE 0x40000000
// Define base address of peripheral alias band
#define ALIAS_PERI_BASE 0x42000000
// Convert PERI address to alias region
#define BITBAND_PERI(a,b) ((ALIAS_PERI_BASE + (a-BITBAND_PERI_BASE)*32 \    + (b*4)))
 
//Define some memory address
#define MAILBOX 0x20004000
//Define a hardware register
#define TIMER 0x40004000
 
// Mailbox bit 0
#define MBX_B0 *((volatile unsigned int *)(BITBAND_SRAM(MAILBOX,0))) 
// Mailbox bit 7
#define MBX_B7 *((volatile unsigned int *)(BITBAND_SRAM(MAILBOX,7))) 
// Timer bit 0
#define TIMER_B0 *((volatile unsigned char *)(BITBAND_PERI(TIMER,0))) 
// Timer bit 7
#define TIMER_B7 *((volatile unsigned char *)(BITBAND_PERI(TIMER,7)))
 
 
int main(void){    
    unsigned int temp = 0;
    MBX_B0 = 1// Word write    
    temp = MBX_B7; // Word read    
    TIMER_B0 = temp; // Byte write    
    return TIMER_B7; // Byte read
}

This is not the only solution to this problem.All common architectures have implemented mechanisms for atomically setting and clearing bits. ARM’s approach is elegant in that it can be exercised with ANSI C, while most others implementations require special C extensions or the use of assembly language.

Thursday, July 27, 2017

Race condition in multithreading: Why to use lock mechanism for shared memory ?

Race condition is race between the users to access some resource.

Example: 
Two thread with no synchronisation or no locking mechanism for variable access, can end up in race condition.

thread1:

if (x == 5) {
    y = x * 2;
}

thread2:
x = 6;

Here problem occurs when check condition in thread1 is done, and then thread2 occurs which chnage x, then the result in y can be different(12) than expected(10).

To solve this kind of problem, Memory lock mechanism, Thread synchronisation, Interprocess ommunication etc. concepts are used.

Volatile and Constant usage

volatile uint32_t x;  // tells compiler not to optimize this. stored on SRAM in global section
const uint32_t x;  // stored on ROM. Part of code memory. Value cant be changed.
volatile const uint32_t x;  // Value cant be changed from the code inside the file where it is declared but can be changed from outside the file.

volatile uint32_t * TCNT;
// TCNT is a pointer to register whose value can be changed outside the scope of program flow.
Read write register. Pointer value (i.e. address of register) can be changed.

const uint32_t * TCNT;
// TCNT is pointer to register whose value cant be changed using pointer dereferencing.
Readonly register. Pointer value (i.e. address of register) can be changed.

volatile uint32_t * const TCNT;
// TCNT is a pointer whose value cant be changed. It point to register whose value can get changed out of flow of program.
Read or Write register.  Pointer value (i.e. address of register) cannot be changed.

const uint32_t * volatile TCNT;
// TCNT is a pointer whose value can be get changed out of flow of code execution. It points to register whose value cant be changed through the code. Its constant and cant be changed by pointer deferencing.
Read only memory.

volatile const uint32_t * const TCNT;
// TCNT is a pointer whose value is constant. It points to register whose value is constant for code, but can get changed out of flow of program execution.
Read only register accessing.

Using pointers, when accessing
- Read only register, whose value is not going to be changed at all use
const uint32_t * ptr;
- Read only register, whose value can change outside the flow of execution
volatile const uint32_t * ptr
- Write register
uint32_t *ptr


Wednesday, July 26, 2017

Clarification on various terms of Embedded microcontrollers

Memory access Architectures:


  • Von-neumann:

Code and data memory on same memory address map
Only one set of address and data bus shared for code, data memory

  • Harvard

Code and data memory on separate memory address map
Two set of address and data bus, one for each memory
eg. 8051, PIC

  • Modified Harvard

1. Almost harvard

Code and data memory on separate memory address map.
But, instruction can be stored on data memory (like SRAM), or data can be stored on Code memory (like FLASH). For accessing data from code memory special instructions are provided.
eg. AVR8

2. Almost von-neumann

Code and data memory on same memory address map
But internal to CPU architecture there are separate instruction and data cache.
Depending on the coherency between the data and instruction cache there are two types:
     a. With coherence (eg. x86, x64)
     b. Without coherence (eg. ARM)
NOTE: Here in ARM architecture, there are possibility of problems with coherency. In order to avoid this the variables should be defined volatile as far as possible. This makes sure, after every operation the output is stored back to SRAM rather than just keeping it on cache and using it for next operation.

Interesting article for the explanation:
http://ithare.com/modified-harvard-architecture-clarifying-confusion/

CPU architecture:


  • 8051

8051is a harvard architecture. Good for small applications, but for big applications where data processing size requried is more. Number of vectored interrupts are less. Lack of memory management unit on chip.

  • PIC

Good for applications where lot of peripheral support required on silicon. It has very small stack memory.

  • AVR

Modified Harvard architecture for 8bit data processing. Good for small applications

  • ARM

Most advanced architecture with memory management, nest vectorred interrupt controller, debug and trace units with support for SWD and JTAG. Capable of operating at high frequencies.

Instruction sets:

  1. CISC - complex instruction set machine

Code size less
Pipelining cant be implemented
Time per instruction not the same.

  1. RISC - reduced instruction set machine

Code size more
Pipelining can be implemented
Time per instruction the same.
Instruction execution statictics are measured in DIPS(Dhrystone instructions per second) or MIPS (milion instruction per second)

Friday, July 21, 2017

Practical significance of Bitfield, union and Structure

/**
  \brief  Union type to access the Special-Purpose Program Status Registers (xPSR).
 */
typedef union
{
  struct
  {
    uint32_t ISR:9;                      /*!< bit:  0.. 8  Exception number */
    uint32_t _reserved0:7;               /*!< bit:  9..15  Reserved */
    uint32_t GE:4;                       /*!< bit: 16..19  Greater than or Equal flags */
    uint32_t _reserved1:4;               /*!< bit: 20..23  Reserved */
    uint32_t T:1;                        /*!< bit:     24  Thumb bit        (read 0) */
    uint32_t IT:2;                       /*!< bit: 25..26  saved IT state   (read 0) */
    uint32_t Q:1;                        /*!< bit:     27  Saturation condition flag */
    uint32_t V:1;                        /*!< bit:     28  Overflow condition code flag */
    uint32_t C:1;                        /*!< bit:     29  Carry condition code flag */
    uint32_t Z:1;                        /*!< bit:     30  Zero condition code flag */
    uint32_t N:1;                        /*!< bit:     31  Negative condition code flag */
  } b;                                   /*!< Structure used for bit  access */
  uint32_t w;                            /*!< Type      used for word access */
} xPSR_Type;

xPSR_Ttpe APSR;

uint32_t var1 = APSR.w;  // If we want to access as a word. Underneath Load Store Instruction
uint8_t var2 = APSR.b.IT;  //If we want to read from bit 25 and 26 only. Under neath Bitfiled instruction.

Hence union brings the freedom of access to a particular register. 

Code provision for handling Little endian and Big endian schemes

Following text is copied from the following linkof Keil ARMCompiler:
http://www.keil.com/support/man/docs/armcc/armcc_chr1359124215078.htm
This is completely for my own reference

#ifndef __BIG_ENDIAN // bitfield layout of APSR is sensitive to endianness
typedef union
{
    struct
    {
        int mode:5;
        int T:1;
        int F:1;
        int I:1;
        int _dnm:19;
        int Q:1;
        int V:1;
        int C:1;
        int Z:1;
        int N:1;
    } b;
    unsigned int word;
} PSR;
#else /* __BIG_ENDIAN */
typedef union
{
    struct
    {
        int N:1;
        int Z:1;
        int C:1;
        int V:1;
        int Q:1;
        int _dnm:19;
        int I:1;
        int F:1;
        int T:1;
        int mode:5;
    } b;
    unsigned int word;
} PSR;
#endif /* __BIG_ENDIAN */

/* Declare PSR as a register variable for the "apsr" register */
register PSR apsr __asm("apsr");

void set_Q(void)
{
    apsr.b.Q = 1;
}

Thursday, July 20, 2017

Why the provision of executing code from SRAM if FLASH is already there on Chip for Microcontroller ?

This has always been a question for me.

FLASH is the area where it is supposed to store the Application instructions.
SRAM is supposed to be used for storing global, static and local variables.

So, why there is sometimes provision provided in micro-controllers to load the code on SRAM and then execute.

Well I found these reasons. Correct me if I am wrong.
- Code execution from SRAM is almost 3 times faster compared to executing from FLASH.
- There are some techniques like instruction pre-fetch buffering, to store the instructions in CPU before it executes. But still SRAM has added advantage over this.
- SRAMs are costly compared to FLASH hence they are usually less in size compared to FLASH on-chip

Tips:
Interrupt service routines(ISR) are the piece of codes that are usually required to be executed very fast. So it might be good idea to store the interrupt routines on SRAM along with the Interrupt vector table.

Developing code from scratch for Bare metal microcontroller

Step1:

Go through the datasheet and technical reference manual of the micro-controller (MCU). Search on the manufacturer website for 

  1. Header files of registers of MCU
  2. HAL layer to reduce the effort of creating from scartch.
  3. If above options are not available then prepare header file on your own by referring to memory map
Example
mcu123.h
...
...
#define ADC1_base 0x08000100
#deinfe ADC2_base 0x08000200
...
...

Step2:

Create user file where all structures will be there to address every register in MCU
user_mcu123.h

/**
 * Bit fields
 */
typedef struct {
  uint32_t ADRDY_MST : 1;  // BIT 0
  uint32_t EOSMP_MST : 1;  // BIT 1
.
.
.
} ADC_CFGR_t


typedef struct {
  uint32_t RESERVED : 3;  //  Bits 0,1,2 reserved
  uint32_t SMP1 : 3;  // BIT 3,4,5
  uint32_t SMP2 : 3;  // BIT 6,7,8
.
.
.
} ADC_SMPR_t

/**
* Structures
*/
typedef struct {
  ADC_CFGR_t CFGR;  // Offset = 0x00000000
  ADC_SMPR_t SMPR;  // Offset = 0x00000004 these are arranged as per the memory map
} ADC_t

Step 3:

user_main.c
volatile ADC_t * const ADC1, * ADC2  //declare two pointers which will of required data type
ADC1 = (ADC_t *) ADC1_base;
ADC2 = (ADC_t *) ADC2_base;

NOTE: There is reason for declaring volatile and const in such fashion for ADC1 and ADC2.
ADC1/2 is a pointer which is constant, but the memory map location to which is points can change. Memory location to which it points is volatile because we are telling compiler that the content of that memory location can change out of sync to the program flow. So restrains compiler from making and optimization to this object  and removing from compiler output.

Memorymap IO and Port mapped IO

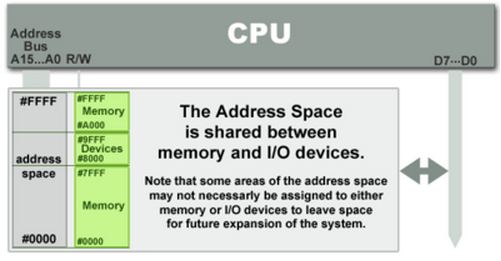
Memory mapped IOs:

All memory and IOs that are addressed using same memory map are called Memory mapped IOs
eg. Motorola

Memory_mapped_io.png

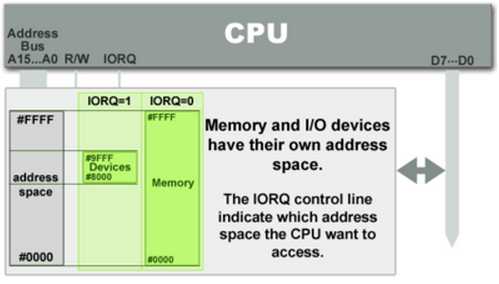
Port Mapped IOs:

Method in which, memory is mapped on one memory map, while IOs are mapped on different memory map is called Port mapped IOs
So here with same address, either IOregister / memory location can be accessed depending upon teh IORQ line value

So if any architecture says it has Port mapped IOs, then it should have a separate instruction for performing fetch from memory and fetch from IO.

NOTE: IORQ line is completely handled by CPU hardlogic after decodiong instruction. User code can't access it through some instruction call.

eg. Intel

Port_Mapped_io.png

http://www.bogotobogo.com/Embedded/memory_mapped_io_vs_port_mapped_isolated_io.php

Callback and Interrupt service routines, one and the same thing.

Interrupts in baremetal:


void ISR_UART1(void) {
    task_a();
    task_b();
    task_c();
}

void ISR_ADC1(void) {
    task_1();
    task_2();
    task_3();
}

void ISR_ADC2(void) {
    task_10();
    task_20();
    task_30();
}

Interrupt vector table


SrNo Address Callback function
1 0x00000000 RESET
2 0x00000014 ISR_UART1
3 0x00000018 ISR_ADC1
4 0x0000001C ISR_ADC2

Here, ISR_UART1(), ISR_ADC1(), ISR_ADC2() are callback functions. They are getting called whenever and Interrupt occurred. When Interrupt occurs, the Program counter is filled with address from above vector table as per the interrupt type. Next step, it interprets the value at this location as function pointer and goes to particular location as mentioned by user.

After RESET, the program counter(PC) gets the next value as per the BOOT pin configuration. So after the Reset, the PC can get value which can be address of start location of FLASH/SRAM/Bootloader etc. as per the MCU specification.

Considering it enters the usercode, the startup code starts executing which is even before main(). Here the STACK, HEAP and instructions to fill vector table with appropriate callback function pointers is done. So the Stack pointer is initialized, Heap pointer is also initialized.

Once this process is done, the program counter is directed to main()

Conclusion: Interrupt service routines are actually callback functions whose address is passed to interrupt vector table. They get called back whenever interrupt occurs.

Wednesday, July 19, 2017

Quick way to represent information graphically using Python

When you have some information example histogram then here is a small example you can refer to:

import random
import numpy as np
import matplotlib.pyplot as plt

x = []
for i in range(1,101):
    x.append(random.randrange(1,101))

h, b = np.histogram(x, bins = 100, range = [0,100])
b = np.delete(b, 0)
plt.show(plt.plot(b,h))


Wednesday, May 17, 2017

PIP installation process & usefulness to Python

PIP is software installer. Follow the below mentioned procedure:


1. setup proxy

copy the proxy from internet explorer

set http_proxy=http://your_proxy:your_port
or
set http_proxy=http://username:password@your_proxy:your_port

set https_proxy=https://your_proxy:your_port
or
set https_proxy=https://username:password@your_proxy:your_port

once thi is done, you are done with setup to install softwares from internet via PIP

2. Install PIP..
$python get-pip.py

3. After this start installing using PIP
eg.
$pip install numpy
$pip install scipy

you can also install from the wheel file downloaded
eg.
$pip install setuptools-23.0.0-py2.py3-none-any.whl

----------------------------------------------------------------------------------------------

Why PIP is useful?
--> Because it downloads all the required dependancy for installing any particular piece of library

Wednesday, May 3, 2017

OPAMP circuit design: Effect of Feedback and inverting Resistor and Capacitors

Feedback resistor and capacitors: (Rf and Cf parallel)
They act upon the high frequency range limiting of the circuit. f2
Basically they form the LPF

Inverting Resistor and capacitors: (R1 and C1 series)
They form the HPF, with cut-off frequency f1

f1 < f2


Series C1 capacitor can be used to amplify only the AC signal at non-inverting terminal and avoid amplification of DC level.

A coupling capacitor Cc is also used at the output of opamp before connecting to next stage so that only the high frequency AC signal is coupled. This is useful to cut down the DC offset to be amplified from one stage to next stage.

And gain of the amplifier is decided by Rf and R1 = 1 + Rf/R1
As gain decreases, the bandwidth increases from both sides

If the C1 is not used, all DC signal is also amplified. So adding the capacitor series to R1 helps.
If needed add the DC level using voltage divider.

Thursday, April 6, 2017

float to int...Interesting difference between TYPECASTING and Ceiling/Flooring/Truncating/Rounding

int a;
float b = 3.45f;
b = b * 3.142f;  /* which is 10.8399
a = (int)b;
printf("%f, %d", b,  a);

here b = 10.8399 and a = 10

this above mentioned method is where, typecasting is used for float to int conversion.
This is not the right way always.
Because it depends on the standards that are used when writing the compiler. How compiler will replace this conversion process.
Usually in C99, it uses truncation when converting float to int. But its not usually desirable, as you can see in the above example use expect it would be 11 rather than 10.

So, in these scenarios one should always use float to int conversion method as per the requirement of the application. There are functions readily available in math.h

  1. ceiling: eg. 10.78-> 11; 10.44 -> 11; 7.5->8; -11.89 -> -11; -11.14->-11; -7.5 -> -7
  2. flooring: eg. 10.78-> 10; 10.44 -> 10; 7.5->7; -11.89 -> -12; -11.14->-12;  -7.5 -> -8
  3. truncating: eg. 10.78-> 10; 10.44 -> 10; 7.5->7; -11.89 -> -11; -11.14->-11; -7.5 -> -7
  4. rounding: eg. 10.78-> 11; 10.44 -> 10; 7.5 -> 8; 8.5->9; -11.89 -> -12; -11.14->-11; -7.5 ->-8; -8.5->-9
  5. rounding even:  eg. 10.78-> 11; 10.44 -> 10; 7.5 -> 8; 8.5->8; -11.89 -> -12; -11.14->-11; -7.5 -> -8; -8.5->-8
I think this is a very important point when your application is demanding precision. Hope it helps

Tuesday, April 4, 2017

Effect of variable typecasting, on the underneath assembly code size


  1. Whenever we type-cast we are actually adding or no-effect on the number of instructions added to code.
  2. If lets say, the controller is 16-bit, and we have uint32_t a = 5, b; b = a *10;
  3. In this case b = a*10 will be performed in 2 parts multiplication. Hence a single multiplication will be replaced by two multiplications
  4. If we typecast it like, b = (uint16_t)a * 10; then it will be replaced by code which will be a single cycle multiplication operation.
  5. Int to float or vice-verse takes lot of time, as the numbers are representations are different and there will instructions of number conversion getting added. This will increase the processing time a lot, even though you see it as a simple one line multiplication in C code.
  6. Hence, always be careful when declaring float in the code. If you dont need that kind of precision, dont use it. Use Fixed point representation instead.
  7. Probably down casting a variable usually reduces the underneath instructions
  8. Processor lets say of 32bit will be optimally used if the data variables to be processed are of size 32bit

Thursday, March 16, 2017

INTERRUPT and EVENT....... Phantom in my head

Whenever a activity occurs, the activity is recognized by GPIO as an external interrupt / event.

  • So what is the difference between interrupt and event ?
  • When to use what ?
  • And finally to implement these concepts ?
When it comes to External Interrupt/ Event, GPIO should be configured in one of the following ways:
  1. External Interrupt, rising edge trigger
  2. External Interrupt, falling edge trigger
  3. External Interrupt, rising & falling edge trigger
  4. External Event, rising edge trigger
  5. External Event, falling edge trigger
  6. External Event, rising & falling edge trigger
In case of Interrupt, ISR related to that interrupt will executed by interrupting the execution flow of program. If the WFI(Wait for Interrupt) instruction is used by CPU to enter Sleep mode, any peripheral interrupt acknowledged by the nested vectored interrupt controller (NVIC) can wake up the device from Sleep mode.

In case of Event, no ISR is executed. If the WFE(Wait for Event) instruction is used by CPU to enter Sleep mode, the MCU exits Sleep mode as soon as an event occurs.


CPU - Sleep mode, is entered by executing the WFI (Wait For Interrupt) or WFE (Wait for
Event) instructions.

In general, external event is used to 
  • enter an ISR, i.e. connecting line to NVIC
  • toggling some bit in CORE register, to wakeup CPU
  • restarting some core clock
  • initiate DMA transfer etc.
Events are also generated Internal to MCU, by lets say DMA on half transfer, full transfer or error in transfer. So what event to handle and how to handle is a part of Event Management Block designer in CPU. Whats in our hand is know what all functionalities the Event management Block of MCU provided and then to configure it according to our application.

Tuesday, January 31, 2017

LT Spice

Types of files:
  1. library files - .lib (SPICE file)
    • .model file that are for intrinsic devices like diodes and transistors
    • .sub or .subckt file are for subcircuit components like opamps that are made up of diodes and transistors
  2. symbol file - .asy
Adding third party model to LT Spice:

Adding a PSpice model of any thrid party vendor to LTSpice:
Example: TLV2316 opamp
  • Open the spice model file of component TLV316.cir or TLV316.txt
  • Copy the SPICE model name TLV316 from .subckt TLV316 IN+ IN- VCC VEE OUT
  • Open LTSpice and Add component symbol: Component->opamp->Universal opamp 
  • Right click on the component and Add SPICE model name to SPICEModel
  • Open SPICE Direcetive and add command: 
.lib D:\ingodbsu\Documents\LTspiceXVII\lib\user_addition\TLV2316\TLV316.txt
  • Set the simulation command
  • Save it and you are done

Monday, January 30, 2017

CAN protocol basic information

CAN - Control Area Network protocol
Multi-master & multicast/ broadcast type system
2 wire interface (Differential signal) CANH CANL

Reliable communication protocol compared to Ethernet. Its better than Ethernet because, in Ethernet when multiple nodes are sending data over the network collision is detected and jamming signal is sent on the line. This causes loss of Bandwidth.
Whereas in CAN, there is a concept called arbitration and hence there is loss of Bandwidth. This makes it reliable and real-time, best suitable for industries where real-time is of utmost priority.

Multiple CAN standards like CiADS301 (CAN in Autoamtion Data Structure) are defined based on
  1. Framework of application
  2. Device profile 
  3. Application profile
CANOpen is a protocol built over CAN. It consist of software part and application
In terms of OSI model task can be divided as
  1. Physical layer: bit transmit and receive
  2. Data link layer: synchronization at start of packet
  3. Network layer: arbitration, addressing
  4. Transport layer: segmentation of large data into small packets
  5. Session layer: handles complete communication cycle. like in case of SDO request to response
  6. Presentation layer: Object dictionary (OD) data handling
  7. Application layer: Requirement specific
Physical layer: CAN Transceiver
Data, Network: CAN Controller
Transport, Session, Presentation & Application layer: Software running on Microcontroller

Why TCP/IP cant be used instead ?
  1. It takes lot of resources of CPU and memory to implement
  2. Cost of HW and SW will be more
  3. TCP/IP is not developed for this purpose. Each packet is 1500 bytes with overhead of 24bytes. Hence if actual data is 1 or 2 bytes then unnecessarily redundancy is introduced.
  4. Jamming signal on collision problem. Hence cant be used for real-time critical applications.
Criteria for deciding on any protocol to use
  1. Performance provided
  2. Price
  3. Resources need

OPAMP parameters and configuration

Types of OPAMP:

  1. Voltage feedback opamp
  2. Current feedback opamp

NOTE: Mostly we use voltage opamps

Configurations:

  1. Voltage Amplifier: Voltage input, Voltage output 
  2. Current Amplifier: Current input, Current output
  3. Trans-impedance Amplifier: Current input, Voltage output
  4. Trans-conductance Amplifier: Voltage input, Current output
Parameters:
  1. Supply voltage range: (Offseted or Rail-to-rail): 
    • Rail to rail are preferred for better range of output voltage
    • This helps in using full range of ADC to which opamp output is connected
    • Otherwise ADC needs to be more precise i.e. more bits of ADC
  2. Single / Dual supply operation supported/ NOT:
  3. Input common mode voltage range
  4. Input impedance
  5. Output Voltage range
  6. Large signal voltage gain
  7. Gain Bandwidth Product:
    • Concept of Gain bandwidth product remaining the same, applies only to voltage feedback opamps
    • For current feedback opamps, feedback resistor is fixed
  8. Slew rate
  9. Output current Sink and source
  10. Input Bias current:
    • Very low for FETs and CMOS input stages
    • Compensation resistor can be added to reduce the bias current
    • But, it has a trade-off. It increases the johnson noise which in turns increases the noise voltage in the circuit
  11. Input offset current
  12. Input offset voltage
  13. Input noise voltage (nV/sqrt(Hz)): 
    • For calculating noise voltage introduced in the circuit = Input noise voltage x (sqrt (bandwidth of opamp))
    • Noise in the circuit also increases with increase in resistors outside the circuit
  14. Common Mode Rejection Ratio (CMRR)
  15. Power Supply Rejection Ratio (PSRR)
  16. Total harmonic Distortion
For precision opamps, following parameters are very important:
  • Input bias current (Ib) = ((Ib+) + (Ib-))/2
  • Input offset current (Iio) = ((Ib+) - (Ib-))
  • Input offset voltage (Vio)
  • Input noise voltage (Vn) = sqrt(4KTB)
  • Effect of temperature on Input offset voltage
  • Trade of between, Input bias current compensation v/s Input noise voltage

Friday, January 27, 2017

Electromagnetic Interference and considerations

Sources of EMI:

  1. Conducted EMI
  2. Radiated EMI
Mediums of EMI:
  1. Wires - conducted EMI
  2. Air/ Space - Radiated EMI
EMI is usually due to 
  • Near by RF transmitter for High frequency noise
  • Switch Mode Power Supply (SMPS) for medium frequency switching noise
  • Low frequency noise like from high voltage AC lines operating at 50Hz or so...
EMI noise is received into the circuit mainly because of 
  • Long tracks
  • Hanging wires
Compoenents like OPAMP may have the parameter EMIRR
  • Electromagnetic Interference Rejection Ratio
  • Better the EMIRR better is the EMI noise immunity of the compoenent
  • There are ESD protection diode inside the OPAMP
FCC limits


Circuit board layout tips:
  1. Keep all connectors on one side
  2. Don't keep high speed circuitary between connectors
  3. Poor decoupling
  4. Short traces for 
  5. Separate the low frequency (Analog signals) and high frequency (Digital signals) grounds i.e. place inductor or ferrite beads to connect grounds of low and high frequency plane
Follow link is a very good example of EMC

Points to consider when designing a circuit board:
  1. Design of ground plane
    • Separation of analog and digital planes
    • But care should be  taken between separting ground planes, because when the nearby connector  (analog and digital) have separate ground planes, this will introduce small potential difference between then, which cause connector cables emitting radiation
    • Coaxial cable have one signal and one ground casing.
    • Hence differential signals i.e. no need of ground plane is the best option to avoid high frequency noise on the ground plane
    • So, selecting OPAMP with differential input is necessary when the input signal is very sensitive to noise from ground plane
    • As C = Ae/d; A = common area of planes, d = distance between planes; so more widely spread power and ground planes, and closer the planes is the best for increasing the inherent capacitance between power and ground
    • Read concept of "common impedance coupling"
  2. Location of high speed circuitry
    • Metal enclosure of product is always better than a plastic enclosure, as metal shorts out the potential difference between the various connectors.
    • Eventually metal casing reduces the radiation to other circuitry, and increase the chances of clearing EMC requirements

  3. Analog signal current return path
    • Dedicated analog return(ground) path for low frequency (analog) signal, and connecting it to ground plane at one point will solve the problem
    • Read topic "Identifying current path"
  4. Routing of clock traces
    • Long distance clock traces are likely to emit EMI to other circuit. So minimize as far as possible
    • Routing clock at the edge of board is a bad idea as it increases coupling of noise of other nearby circuits
  5. Decoupling capacitors
    • Decoupling capacitors should be close (local decoupling) to VDD of IC when the power and ground plane are separated by distance more than 1mm (Far placed)
    • Decoupling capacitors can be placed away from the ICs when the power and ground plane are placed close as 0.25mm
    • If power plane is farthest from the components, then decoupling capacitors should be placed close to VDD
    • If ground plane is farthest from the components, then decoupling capacitors should be placed close to GND
  6. Power Integrity
    • This means adequate decoupling
  7. Noise immunity
    • Radiating emission structures on board are usually of lengths greater than 1/10th of the wavelength of signal they carry
  8. Immunity to ESD and fast transients
    • Filter io and power lines

Thursday, January 5, 2017

Green colour's in your balcony. Want it.....? (Yes): Follow me

Important points for gardening in pots:

  1. Soil
  2. Compost
  3. Fertilizer
  4. Pest control
  5. Plant pot
Soil:
  • One should use potting soil for plants in pots
  • Normal garden soil is not good for plants that are to be planted in pots as air flow and draining is not that efficient. This can affect the plant growth considerably
  • Potting mix has just the perfect water holding capacity required for pot plants
  • Also add organic compost to potting mix for better nutrition value
Compost:
  • Compost adds excellent macro nutrition to soil and eventually to the plant. Its has ingredients  like carbon, iron etc. that are not prime requirements of plants but, they certainly do play a role
  • Compost made from cow dung is very high in nutrition. It is available locally at plant nursery.
  • Earth worm compost is the best if you can get it
Fertilizer:
  • N-P-K are the basic components for plant growth
    • Nitrogen (N) - Useful for plant leaf growth
    • Phosphorous (P) - Required for flower and fruit growth
    • Potassium (K) - Required for plant strength, general supporting ingredient for plant
  • When buying and fertilizer check the NPK value
  • Usually numbers are like NPK= 20-5-5
  • DAP (Di-ammonium phosphate) has nitrogen and phosphorous in large quantities that boost the plant leaf, flower and fruit growth. It is one of the famous fertilizers used.
  • But try using organic fertilizers are fast as possible
  • RHBP- Liquid Bio-Fertilizer is the famous that I found on amazon
  • DAP fertilizer are available with all local garden plant nursery also.
Pest control:
  • Mealy bug is the most that I observed on the plants that grow in city
  • Indications of mealy bug on plant are, the leaf of plant are not straight. Leaf that turn crooked are most of the times having mealy bug growth on/under the leaf.
  • Plants die if not attended in time. Bugs take away the vital nutrient of the plant nitrogen and phosphorous.
  • Hence don't over fertilize the plant as it attracts more mealy bug
  • Neem oil extract related pest controls, are the best pest control for mealy bug
  • Organic Dews Organic Neem Oil is also good for mealy bug problem
Plant pot:
  • Pot should have holes in the bottom to drain the extra water. Water logging shouldn't be the case in pots
  • Lay some small stones or pebbles in the bottom of pot
  • Some coconut husk above it
  • Mix the potting soil with compost in 50-50 proportion and fill the pot 3-4 inch
  • Make a hole in the middle and place the plant
  • Add some more mix 1-2 inch. In case of seeds only add 1 inch of mix above, so that seeds could germinate easily.
  • Fill the pot with mix only to point which is 1-2 inch below the top edge of the pot
  • Now add some water to the pot
  • Purna Mitti is good potting mix

PROFILE

My photo
India
Design Engineer ( IFM Engineering Private Limited )

Followers